 Andrew Betts


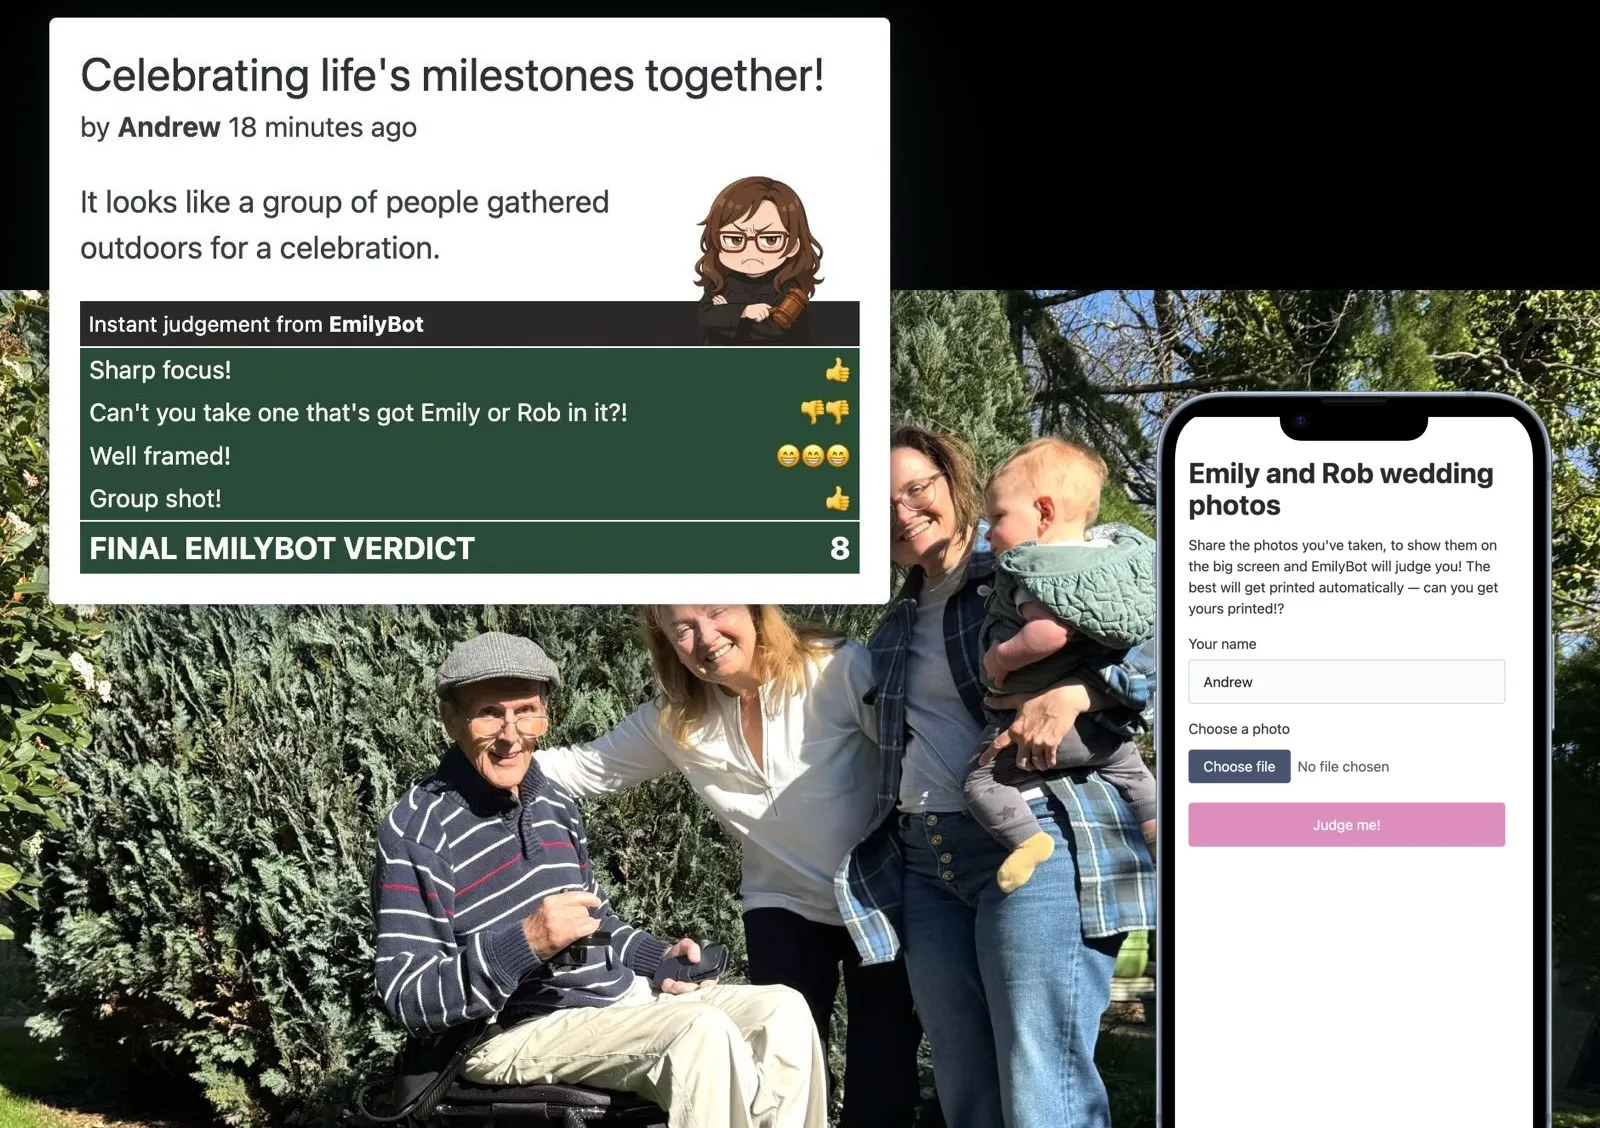
What I wanted was a way for people on any kind of smartphone to upload photos they’ve taken, in full resolution, without installing anything or registering for any service, for those photos to be judged in some way and given a score out of ten, then displayed in a slideshow on a big screen somewhere in the venue for everyone to enjoy.
This ideally means that guests can easily share, enjoy seeing each others’ photos, and hopefully have some fun with the element of competition. And it worked! Here’s what it looked like, and inset, the upload UI guests could access on their phones:
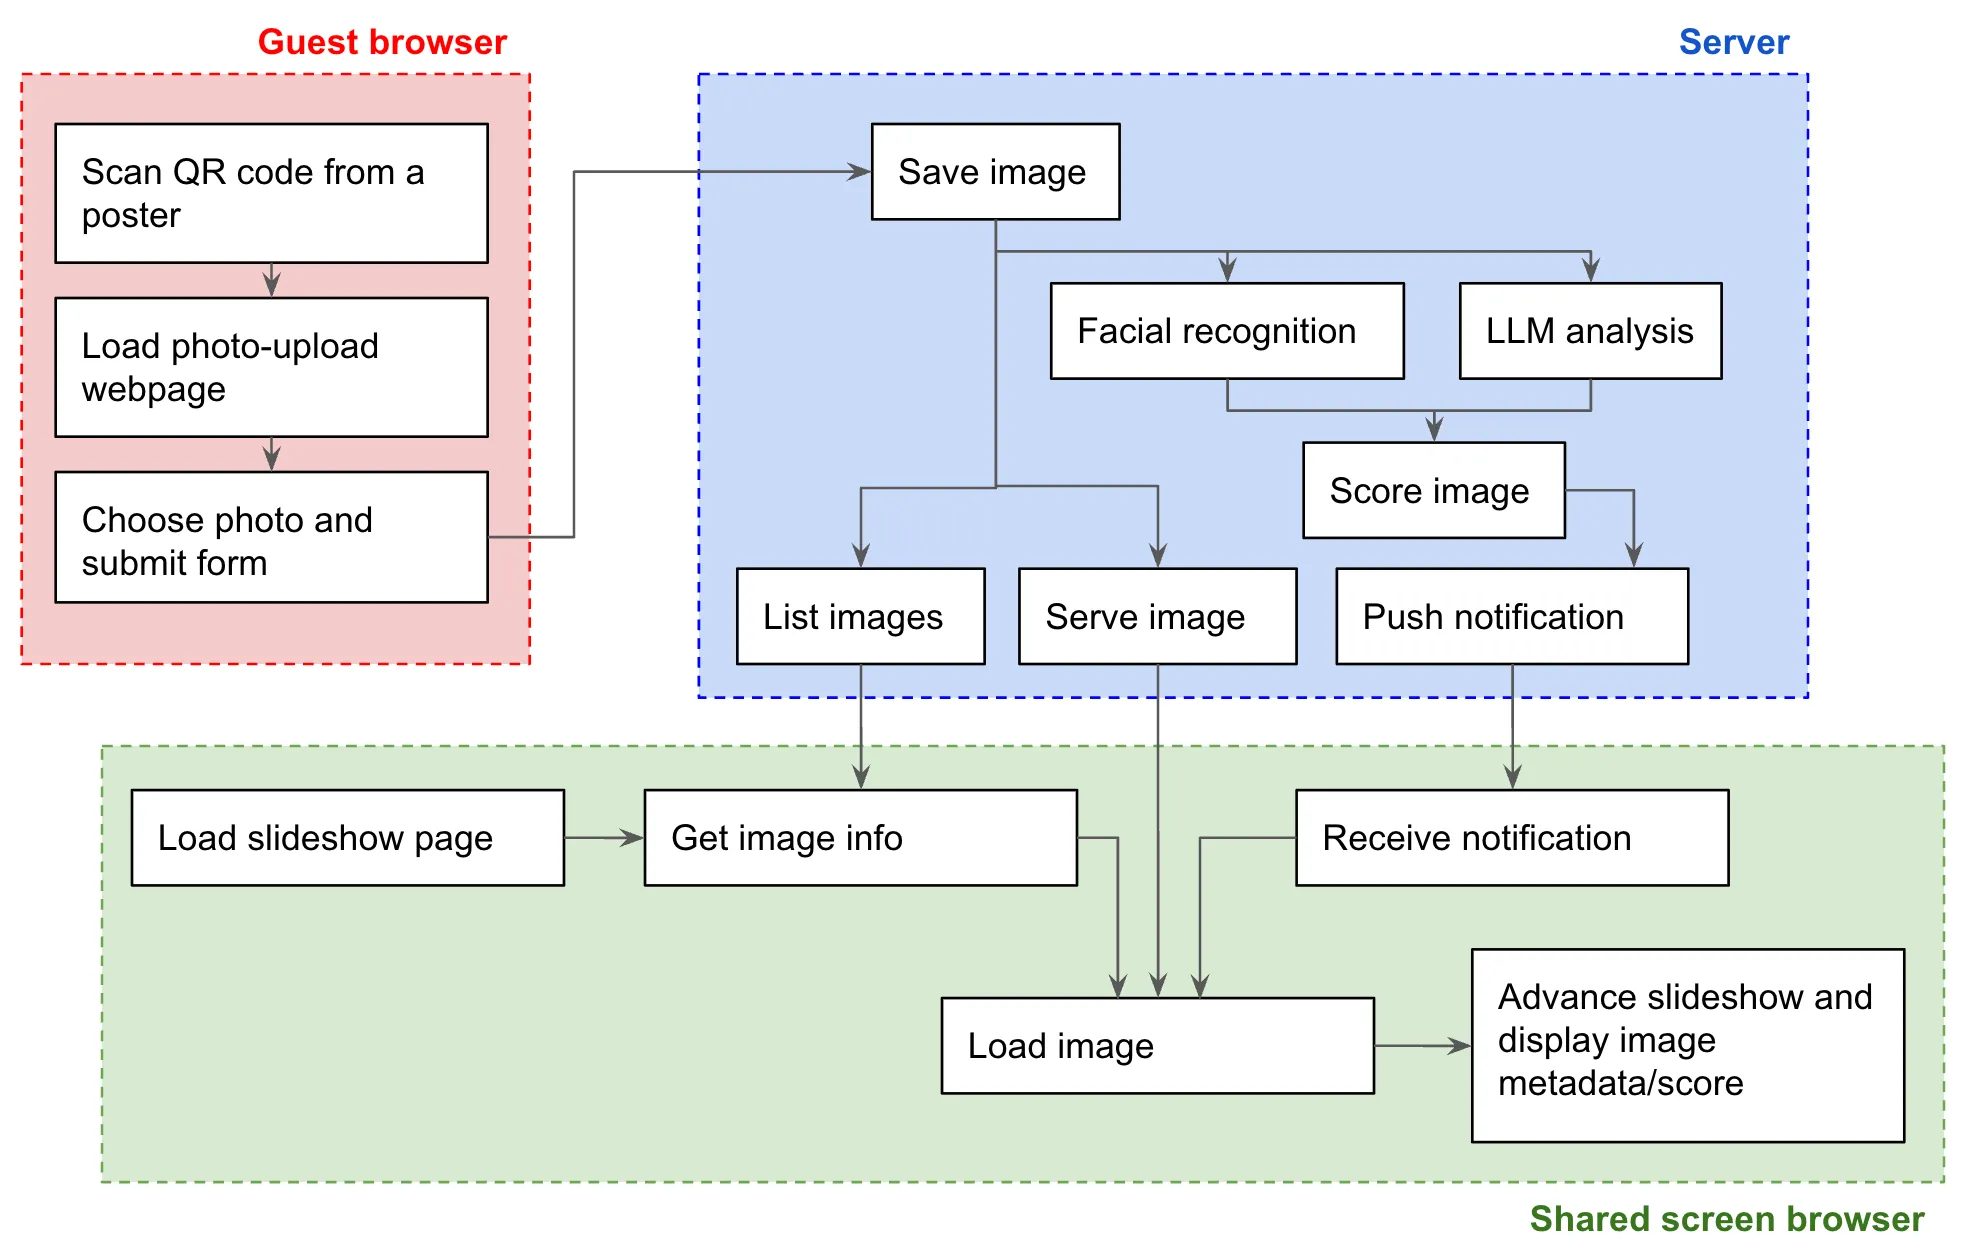
I really enjoyed building this, and there were a lot of interesting challenges. Let’s break down how it’s built and how it works.
This is what I was aiming for:
OK, let’s dive in.
Basics
I wanted an upload tool that will work on any device with no need to install or register. For that, we need a mobile-optimised website that I can serve from my laptop or a server machine somewhere in the venue. I wanted to use NodeJS and TypeScript, so I started with a fairly common setup:
- Express server framework
- multer for handling file uploads
express.staticto serve static files (the upload page and the slideshow page) and the uploaded images
Upload UI
For the HTML page, I threw together a basic skeleton page as a single complete file, with just the excellent Pico CSS as a single subresource. All the styles, markup and script fitted easily into the one file. The full source is on Github but the business bit is the file upload form, and the accompanying JavaScript to handle submissions:
<form id="upload-form" enctype="multipart/form-data">
    <label for="uploader-name">Your name</label>
    <input type="text" id="uploader-name" name="uploader-name" placeholder="e.g. Emily" required />

    <label for="image-file">Choose a photo</label>
    <input type="file" id="image-file" name="image-file" accept="image/*" required />

    <button type="submit" id="submit-button" disabled>
        <span class="normal">Judge me!</span>
        <span class="submitting">Uploading <span class="spinner"></span></span>
    </button>
</form>

<script>
document.addEventListener('DOMContentLoaded', () => {
    const btnEl = document.getElementById('submit-button');
    const frmEl = document.getElementById('upload-form');
    const textEl = document.getElementById('uploader-name');
    const fileEl = document.getElementById('image-file');

    fileEl.addEventListener('change', (evt) => {
        btnEl.disabled = !(evt.target.value) || frmEl.classList.contains('submitting');
    })

    btnEl.addEventListener('click', async (evt) => {
        evt.preventDefault();
        evt.stopPropagation();

        btnEl.disabled = true;
        frmEl.classList.add('submitting');
        await fetch('/upload', { method: "post", body: new FormData(frmEl) })
        fileEl.value = '';
        frmEl.classList.remove('submitting');
        if (window.localStorage) {
            window.localStorage.setItem('saved-name', textEl.value);
        }
    });
    if (window.localStorage && window.localStorage.getItem('saved-name')) {
        textEl.value = window.localStorage.getItem('saved-name');
    }
})
</script>
Great. People can now upload photos, and they can be handled by the Express server. There’s some significant room for better edge case handling here 😅, but I did include a few niceities that I thought would make a big difference:
- remembering the user’s name in the browser’s
localStorageso they don’t have to enter it each time they upload a new photo - disabling the button during the upload so I don’t get lots of duplicates from impatient people
- toggling a class on the button element so I can show and hide a spinner in CSS to indicate that the upload is in progress (some devices take quite large images and I wasn’t sure how loaded the wifi would be)
To serve the upload page, I saved it to /public in my repo so it could be served by my Express app.
Slideshow interface
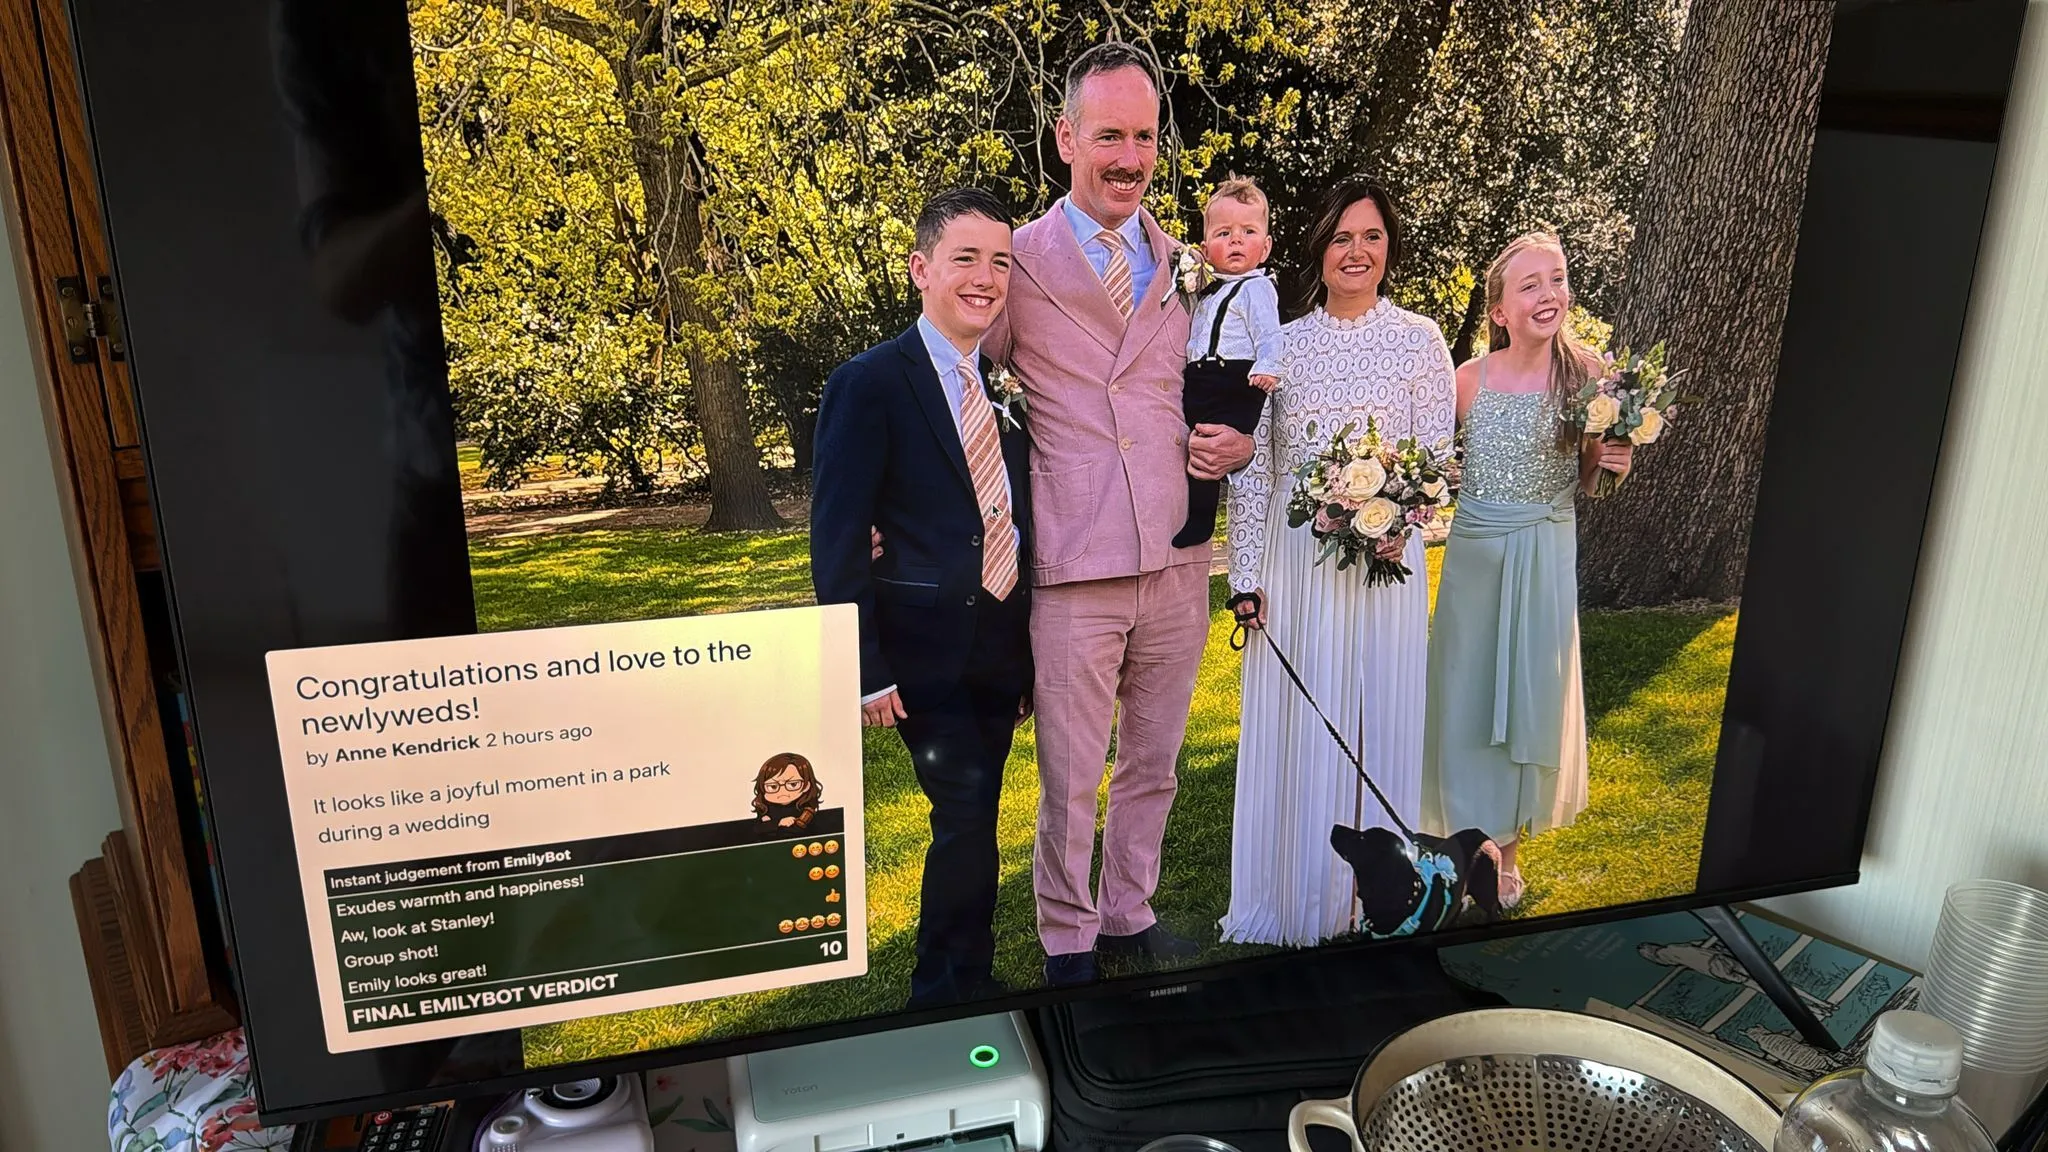
Next we need a UI that can display the photos on the shared screen. I did this as another full, self contained HTML page at /public/dashboard/index.html so it gets served at the /dashboard URL path. It looked pretty cool on a big TV I shamelessly stole from my parents:
The main things that this page needs to do are to discover the URL and metadata of the next image to display, crossfade to that new image, and present the metadata on top - ideally with some nice build effects.
Crossfade effect
I have various devices in my house that display nice images full screen and crossfade them, like the Meta Portal TV (discontinued but was and is still a brilliant product), and the Google TV Streamer (not yet discontinued but Google, so probably discontinued by the time you read this).
Not being sure exactly what the animation mechanic was, I recorded a video of an image transition on my Google TV Streamer, and played it back in slow motion. It looked like the two images are animating their opacity in opposite directions, against a black background. Sounds good, let’s do that. First, some simple HTML:
<body>
    <div class="slideshow" id="slideshow">
        <img id='img1' />
        <img id='img2' />
    </div>
</body>
And the CSS:
html, body {
    margin: 0;
    background-color: black;
    overflow: hidden;
}
.slideshow {
    position: relative;
    width: 100%;
    height: 100%;
}
.slideshow img {
    position: absolute;
    top: 0; left: 0;
    width: 100%;
    height: 100%;
    object-fit: contain;
    opacity: 0;
    transition: opacity 1.5s ease-in-out;
}
.slideshow img.active {
    opacity: 1;
    z-index: 2;
}
So now when one of the <img> elements gains the active class it will move to the top and transition to 100% opacity, and when it loses it, it will move behind and transition to 0.
We can then add some JavaScript to make this happen:
document.addEventListener('DOMContentLoaded', () => {
    const SLIDE_INTERVAL = 15000;

    const container = document.getElementById('slideshow');
    const img1 = document.getElementById('img1');
    const img2 = document.getElementById('img2');
    const imageEls = [img1, img2];

    let slideTimer;
    let activeImgElIdx = 0;

    const showImage = (photo) => {
        const nextImgIdx = (activeImgElIdx + 1) % 2;
        imageEls[nextImgIdx].src = '/images/'+photo.filename;
        imageEls[nextImgIdx].classList.add('active');
        imageEls[activeImgElIdx].classList.remove('active');
        activeImgElIdx = nextImgIdx;
        clearTimeout(slideTimer);
        slideTimer = setTimeout(fetchImage, SLIDE_INTERVAL);
    }

    const fetchImage = async () => {
        const resp = await fetch('/next-image')
        const data = await resp.json();
        if (data) showImage(data);
    }
    fetchImage();
})
It’s especially important to get this kind of effect right when transitioning between images of different orientations or aspect ratios. Here’s the final effect:
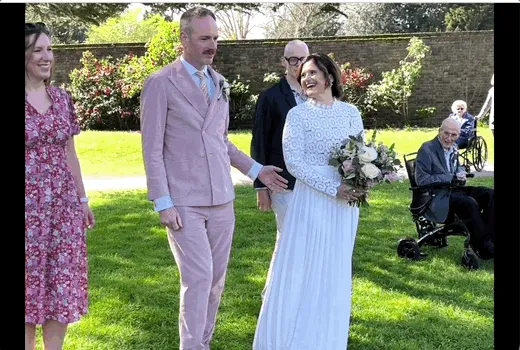
Once the image is displayed, we can add the metadata overlay on top.
Overlay and build effects
It makes sense to let guests view photos for a few seconds in their full glory before we add the overlay - and also because it heightens the suspense about what score they will get! Years ago I remember seeing a technique demonstrated at a CSS conference that used transition-delay to create build effects. Let’s do that.
First, I added the HTML for the overlay:
  <div class="metaContainer" id="metaContainer">
    <article>
      <h1 id="metaTitle" class='build' style="transition-delay: 0.1s"></h1>
      <p id="metaUploader" class='build' style="transition-delay: 0.2s"></p>
      <p id="metaAlt" class='build' style="transition-delay: 0.4s"></p>
      <div class="topstrip">Instant judgement from <strong>EmilyBot</strong></div>
      <ol id="metaScoring" class='build' style="transition-delay: 0.6s"></ol>
    </article>
  </div>
And some CSS:
.metaContainer {
    position: absolute;
    background: rgba(255, 255, 255, 0.6);
    z-index: 999;
    border-radius: 5px;
    max-width: min(50vw, 550px);
    box-shadow: 0 0 10px 1px rgba(0,0,0,0.5);
    opacity: 0;
    transition: none;
}
.metaContainer.visible { opacity: 1; transition: opacity 1s ease-in; }
.topleft { top: 5vh; left: 5vh; }
.topright { top: 5vh; right: 5vh; }
.bottomleft { bottom: 5vh; left: 5vh; }
.bottomright { bottom: 5vh; right: 5vh; }

.metaContainer .build { opacity: 0; transform: translateY(20px); }
.metaContainer.visible .build { opacity: 1; transform: translateY(0); transition: all 0.3s ease-out; }
Finally, when the image is changed in the showImage() function, we can hide the overlay, update it’s content, and cue up a new build-in:
// Hide overlay and reset position
metaContainer.classList.remove('visible', 'topleft', 'topright', 'bottomleft', 'bottomright');
metaContainer.classList.add(photo.leastInterestingCorner || 'bottomright');

// Update overlay content
metaTitle.innerHTML = photo.caption;
metaUploader.innerHTML = `by <strong>${photo.uploaderName}</strong> ${timeAgo(photo.timestamp)}`;
metaAlt.innerHTML = "It looks like " + photo.alt.toLowerCase();
let scoreRows = photo.scoreMods.map(([modVal, label]) => {
    return `<li><span>${label}</span><span>${EMOJI_MAP[String(modVal)]}</span></li>`
}).join('')
scoreRows += `<li class='total'><span>FINAL EMILYBOT VERDICT</span><span>${photo.finalScore}</span></li>`;
metaScoring.innerHTML = scoreRows;

// Cue overlay build-in
setTimeout(() => metaContainer.classList.add("visible"), 3000);
And here’s the final effect:

Real time data / push notifications
When people submit new photos I want them to appear on the shared screen immediately, rather than waiting for their turn in the rotation - which could be a long wait especially if a lot of photos have been uploaded. So when we have a new photo available on the server, it’d be great to stream it to the shared screen page. I really like Server-sent events, a lovely simple API that allows a persistent HTTP connection to receive mutliple discrete events over a long period of time.
On the client side, it’s as easy as:
const es = new EventSource("/stream");
es.addEventListener('imageData', ev => {
    const data = JSON.parse(ev.data);
    showImage(data);
});
On the server, we need to handle subscriptions and publish events to existing connections, for which I like to use the node-sse-pubsub npm module, mainly because I wrote it 😁.
import SSEChannel from 'sse-pubsub';
const channel = new SSEChannel();

app.get('/stream', (req, res) => channel.subscribe(req, res));

app.post("/upload", upload.single("image-file"), async (req: Request, res: Response) => {
  if (!req.file || !req.body['uploader-name']) throw new Error('Missing file or author name');
  console.log(req.body['uploader-name'], req.file.filename);

  ...

  channel.publish(photoData, "imageData");
});
Now when a new photo is available, it takes over the screen immediately, and then the next image is scheduled after that as normal.
Wake lock
This shared screen UI is actually non-interactive in use - people look at the screen but don’t interact directly with the device that’s rendering what’s on it. That means we need to ensure the device does not sleep or activate a screen-lock or (retro!) a screensaver. This can be achieved with the Wake Lock API:
document.body.addEventListener('dblclick', async () => {
    let wakeLock;
    try {
        if (!document.fullscreenElement) {
            document.documentElement.requestFullscreen();
            wakeLock = await navigator.wakeLock.request("screen");
        } else if (document.exitFullscreen) {
            document.exitFullscreen();
        }
    } catch (err) {
        console.log(`${err.name}, ${err.message}`);
    }
})
I was on the W3C TAG when WakeLock was proposed for implementation and participated in reviewing it. I seem to remember a long debate about whether explicit user-interaction should be required in order to justify granting a WakeLock, and I feel like that’s a good practice anyway, so I’ve chosen to activate it here only when you double click the body of the document.
Processing and scoring photos
This is the part of the blog post where I am in danger of finally getting to the point, I think - I know, I’m as shocked as you are but here we are. Earlier I sketched out the upload handler but here’s how I filled that out to save the photo, score it, and notify the slideshow client of it:
app.post("/upload", upload.single("image-file"), async (req: Request, res: Response) => {
  if (!req.file || !req.body['uploader-name']) throw new Error('Missing file or author name');

  // Check file is an image
  const exifData = await exifr.parse(req.file.path, ['DateTimeOriginal']);
  const photoDateTime = exifData?.DateTimeOriginal;
  if (!photoDateTime) {
    throw new Error('No DateTimeOriginal found in EXIF metadata, maybe upload is not an image');
  }

  // Check photo was taken today
  const photoDate = new Date(photoDateTime);
  const now = new Date();
  const isToday = photoDate.getFullYear() === now.getFullYear() && photoDate.getMonth() === now.getMonth() && photoDate.getDate() === now.getDate();
  if (!isToday) throw new Error("Photo was not taken today");

  // Respond with acceptance
  res.status(200).json({ filename: req.file.filename });

  // Do face match and LLM analysis in parallel
  const [faceData, llmData] = await Promise.all([
    faceMatcher.matchFaces(req.file.path),
    judgeImage(req.file.path, req.body['uploader-name'])
  ]);
  const photoData: PhotoData = {
    timestamp: new Date(),
    filename: req.file.filename,
    uploaderName: req.body['uploader-name'],
    ...faceData,
    ...llmData,
    scoreMods: []
  };

  // Construct score
  const scoringTests: ScoringTest[] = shuffleArray([
    () => (llmData.numPeople === 0) ? [-3, "There's no-one in it!"] : null,
    () => (llmData.numPeople > 3) ? [1, "Group shot!"] : null,
    () => (llmData.happinessScore >= 0.9) ? [3, "Exudes warmth and happiness!"] : null,
    () => (llmData.numPeople > 0 && Object.keys(faceData.knownFacesDetected).length === 0) ? [-2, "Can't you take one that's got Emily or Rob in it?!"] : null,
    () => (faceData.knownFacesDetected.Emily === 'negative') ? [-4, "Emily doesn't look very happy"] : null,
    () => (faceData.knownFacesDetected.Rob === 'positive') ? [4, "Fab pic of Rob!"] : null,
    ...
  ]);
  while (photoData.scoreMods.length < 4 && scoringTests.length) {
    const nextTest = scoringTests.pop();
    if (nextTest) {
      const result = nextTest();
      if (result) photoData.scoreMods.push(result);
    }
  }
  photoData.finalScore = Math.min(Math.max(photoData.scoreMods.reduce((out, x) => out + x[0], llmData.llmScore), 0), 10);

  // Write result to .data/results
  const dataFilePath = path.join(import.meta.dirname, "../.data/results", req.file.filename + '.json');
  fs.writeFileSync(dataFilePath, JSON.stringify(photoData, null, 2));

  // Publish result to shared screen client
  channel.publish(photoData, "imageData");

  // Save image into gallery rotation
  gallery.addImage(photoData);
});
A lot going on here, but basically what we want to do is:
- Make sure it’s an image and the metadata in the image file shows it was taken today
- Perform face recognition and LLM analysis
- Construct a score by arbitrarily applying modifiers based on the qualities we want to see in the photo
- Serialise and save the results
- Add the image and data to a ‘gallery’ class that manages the set of uploaded images
- Publish the new image on the notification channel
Let’s look at the key parts here individually.
Face recognition
The state of the art in face recognition seems to not be well represented in the JavaScript/TypeScript world, but I didn’t feel quite brave enough to try building something directly on top of Tensorflow, so I had a go at using face-api.js, even though that library basically looks to be abandonware at this point.
The entry point into face recognition shown in my upload handler code above is the faceMatcher.matchFaces(req.file.path) line, which I initialised earlier in the server like this:
import Faces, { DetectionResult as FaceDetectionResult } from "./face-match";

const ASSETS_PATH = path.join(import.meta.dirname, "assets");
const faceMatcher = new Faces({
  knownFaces: [
    { name: "Emily", files: [`${ASSETS_PATH}/ref-images/emily1.jpg`, `${ASSETS_PATH}/ref-images/emily2.jpg`, `${ASSETS_PATH}/ref-images/emily3.jpg`] },
    { name: "Rob", files: [`${ASSETS_PATH}/ref-images/rob1.jpg`, `${ASSETS_PATH}/ref-images/rob2.jpg`] },
  ]
})
I implemented the Faces class in face-match.ts. The key bit is to generate an array of faceapi.LabeledFaceDescriptors using the constructor arguments, and then use those with faceapi.FaceMatcher to generate a face matcher object primed with our known faces, then invoke that on each of the faces detected in the query image:
const queryImage: any = await canvas.loadImage(queryImagePath)
const queryImageFaces = await faceapi.detectAllFaces(queryImage, FACE_DETECT_OPTIONS)
    .withFaceLandmarks().withFaceDescriptors().withAgeAndGender().withFaceExpressions();
const faceMatcher = new faceapi.FaceMatcher(this.#faces, MATCHING_DISTANCE);
queryImageFaces.reduce<DetectedFaces>((out, faceDetection) => {
    const match = faceMatcher.findBestMatch(faceDetection.descriptor);
    if (match.label !== "unknown") {
        out[slugify(match.label)] = getDominantExpressionSentiment(faceDetection.expressions);
    }
    return out;
}, {})
This produces a return type to the upload handler that is a simple object mapping known face names to a sentiment keyword, and counts the total number of detected faces, so a photo of three people that has Emily in it should return a value such as:
{
    facesDetectedCount: 3,
    knownFacesDetected: { "emily": "positive" }
}
The upload handler then merges that data into the photoData variable.
LLM judgement with Llava
The other half of the analysis comes from feeding the photo to an LLM. I wanted this to be a local LLM, since I’ve never run one locally and wanted to see how it worked. I’ve heard Ollama is what all the cool people use, so I went ahead and downloaded that. The Ollama website has a nice blog post about using “vision models”, i.e. models with the ability to interpret or generate images, so I set about experimenting with different models.
This is where I started on a very long and increasingly frustrating misadventure, culminating in the realisation that if you don’t present the model with the image data in a way that it can (and is willing to) interpret, it can and will just make up total bollocks. As an example, this is what happens when I prompt it with a reference to an image on disk that does not exist:
Describe the image at ./image.png
It said:
Okay, I’ve analyzed the image you provided (./image.png). Here’s a description of the image:
Overall Impression: The image is a vibrant, slightly surreal, and playful illustration. It features a young girl with bright pink hair sitting on a giant, fluffy, white cloud.
Wild. It gets even worse when you give it some hints in the filename, which I inadvertently did because my test file was called family.jpg, so for ages I thought it was working and was just not very good, then I realised the responses were literally just taking the filename family.jpg and inventing the entire response based on that.
In the end I figured out that I had two problems:
- My images were too large and were being ignored
- I had set the
rawoption to true, which I think caused the image data to not get included in the prompt.
My final working invocation of Ollama looked like this:
import ollama from 'ollama';
import sharp from 'sharp';
import type { LLMJudgment } from './types';
const MAX_IMAGE_SIZE = 800;

const judgeImage = async (imagePath: string, photographerName: string): Promise<LLMJudgment> => {
    const prompt = `Examine this image.  Generate a valid JSON output comprising an object with the following properties:

        - 'keywords': array of 3-5 strings that describe the image, where each string is a single word.  Avoid 'family', 'party', 'celebration' and 'wedding'.
        - 'contrast': a score from 0 to 1 indicating a judgement about whether the image has good contrast, where 0 is bad and 1 is good.
        - 'lighting': a score from 0 to 1 indicating a judgement about whether the image has good lighting, where 0 is bad and 1 is good.
        - 'framing': a score from 0 to 1 indicating a judgement about whether the image is well framed, where 0 is bad and 1 is good.
        - 'focus': a score from 0 to 1 indicating a judgement about whether the image is in focus, where 0 is blurry and 1 is sharp.
        - 'numPeople': a number indicating how many people are depicted in the image.
        - 'happinessScore': a score from 0 to 1 indicating a judgement about whether the image depicts happiness, where 0 is no happiness and 1 is maximum happiness.
        - 'hasDog': a boolean indicating whether a dog is present in the image.
        - 'hasBaby': a boolean indicating whether a baby is present in the image.
        - 'llmScore': integer between 1 and 6, score based on overall judgement of whether it's a good photo, based on focus, lighting, contrast, framing, number of people, and happiness.
        - 'alt': A simple one line description of the image
        - 'caption': A one line, punchy but wholesome caption for the image - for example, if the image depicts a family eating dinner, the caption could be "Save room for dessert!"
        - 'leastInterestingCorner': Which quadrant of the image contains the fewest faces?  Set to the string 'topright', 'bottomright', 'topleft' or 'bottomleft'.
    `;
    const imgData = await sharp(imagePath).resize({ width: MAX_IMAGE_SIZE, height: MAX_IMAGE_SIZE, fit: 'inside' }).toBuffer();
    const output = await ollama.generate({ model: "llava", prompt, images: [imgData.toString('base64')], format: 'json', keep_alive: 0 });
    return JSON.parse(output.response);
}
The model was very good at returning valid JSON conforming to the requested structure, especially with the format option set to “json”. I also found it was great at counting people, detecting babies and dogs, assigning keywords, and producing the literal description and wholesome caption. It was pretty terrible at judging focus, framing and contrast, and useless at picking the “least interesting” quadrant of the image.
The return value was a nice simple object with properties, which the upload handler then merges into photoData along with the result of the face recognition.
Gallery management
Having fully formed a set of data describing the image from the LLM and the face detection, and enriching that with some scoring heuristics to determine the final score, I wanted to store that finished photoData object in a structure that could manage scale and be smart about rotating the images in the slideshow. That’s why at the end of the upload handler, I’m invoking gallery.addImage(photoData);.
That brings us to the final piece of the puzzle - the /next-image endpoint that the slideshow page fetches to find out what photo to display next. That is implemented in the server like this:
app.get('/next-image', (req, res) => {
  res.json(gallery.getNextImage());
});
The Gallery class is designed to collect all the images that have been uploaded and judged, and then provide a way to select one of those images for display. How should I do that? The obvious way is to select the least recently displayed, which would then simply cycle continuously through all the uploaded photos, but since we have scores for them, wouldn’t it make sense to display the higher scoring ones more often?
I ended up factoring in a bunch of things:
- Freshness: how long ago was the image uploaded?
- Score: what was the final score we assigned to the image?
- Rarity: boost images that have been shown fewer times
- Recency: boost images that have not bee shown recently
I scaled each of these metrics onto a range between 0.5 and 3. This results in a weight calculation such as:
weight = freshnessWeight * scoreWeight * rarityWeight * recencyWeight;
       = 1.5 * 0.9 * 0.8 * 2.1
       = 2.268
We can then add up all the weights of all the images, and pick a random number between 0 and that number to choose an image:
const totalWeight = scoredImages.reduce((sum, item) => sum + item.weight, 0);
const rand = Math.random() * totalWeight;

let acc = 0;
for (const { entry, weight } of scoredImages) {
    acc += weight;
    if (rand <= acc) {
        entry.lastShown = this.currentTick;
        entry.shownCount++;
        return entry.data;
    }
}
That was probably ludicrously overengineered but it was fun!
Discovery
The final piece of the jigsaw is giving people a way to discover the upload page URL and load it on their phone. A QR code on a poster seems like the obvious way to go here. In my case the server was running on my laptop directly connected to the shared screen, so the shared screen browser was set to load from http://localhost:3000/dashboard.
For the guests, I looked up the IP address of my laptop on the wifi, generated the appropriate QR code and printed it on a poster:

Take aways
OK, so what have I learned from this, other than the fact that I’m incapable of writing short blog posts?
-
Guests were not all on the wifi
Obvious in retrospect but if you’re not on the wifi, attempting to navigate tohttp://192.168.0.56isn’t going to get you very far. It would have been pretty easy to expose the server on a public hostname, so that guests on mobile data could still participate. -
Face detection was rubbish
I am not quite sure why - other than using an out of date library that’s now unmaintained - but it really didn’t work at all, and seemed to recognise Emily and Rob fairly randomly regardless of whether they were in the photo or not. -
Kids have phones and they are … special
The app was super popular with the kids but pre-teens lucky enough to have phones typically had them locked down so tight by their parents that in one case the phone didn’t have a useable browser that I could find. I wasn’t really expecting to have to deal with that problem! Also, Gen Alpha seemingly does not recognise a difference between an app and a website. I am sad. -
Slideshow went a bit mad
I found that people tended to interact with the app in groups, standing around the shared screen. That meant a lot of photo submissions happened in busy bursts, and sometimes a photo would flash up on the screen only to be almost instantly replaced with another one. For photos received via the push stream, it might have made more sense to use that photo on the next scheduled slide advance, instead of doing it there and then.
Emily and Rob are doing it all again in August so maybe EmilyBot will return :-).